Wprowadzenie
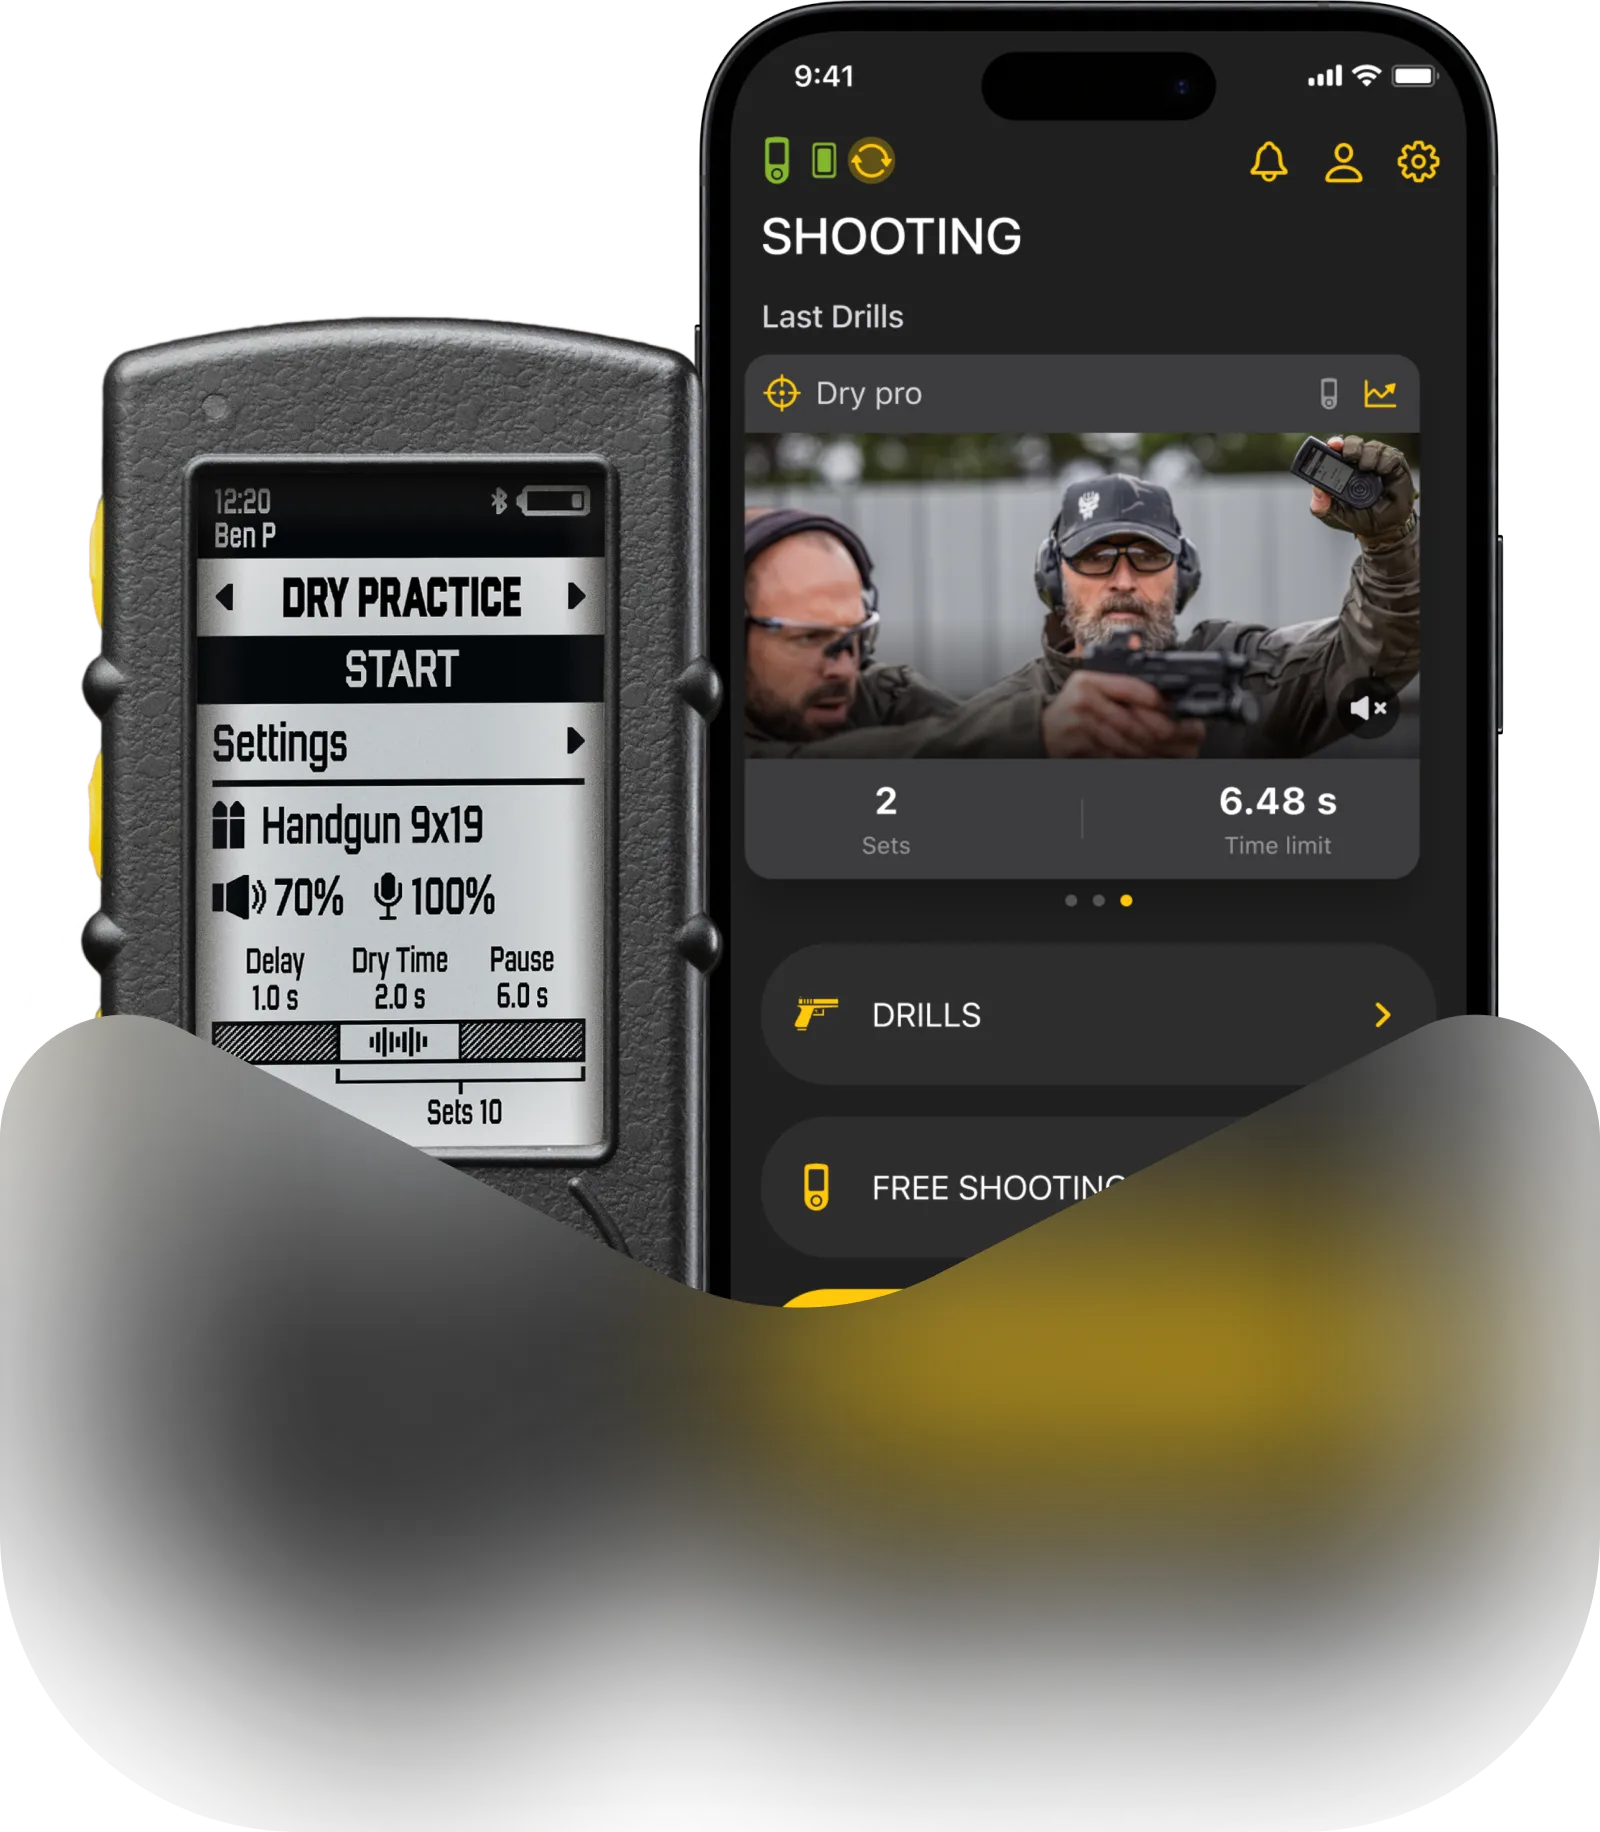
Menu Ćwiczenia – Strzelanie na sucho umożliwia tworzenie własnych ćwiczeń na sucho oraz monitorowanie postępów w danym ćwiczeniu w czasie dzięki rozbudowanym statystykom i wykresom w aplikacji Ćwiczenia w trybie Smart.
Lub trenuj przy użyciu klasycznych sygnałów czasu PAR w klasycznym trybie strzelania na sucho.
Aby dowiedzieć się więcej o tworzeniu i używaniu ćwiczeń w aplikacji Drills App, przejdź do tego przewodnika.
Na ekranie głównym zobaczysz:
Wybrany Dry fire drill
Wybrany typ broni
Głośność buzzera
Czułość sensora
Czas oczekiwania
(Aby dowiedzieć się więcej o tych ustawieniach, przejdź do Presets and Gun types)
Poniżej znajduje się tryb strzelania na sucho – Klasyczny lub Smart
Ustawienia programowania timera (ustawienie czasu PAR)
Opóźnienie przed startem
Całkowity czas – Suma wszystkich limitów czasu i przerw
Czas pauzy – Czas resetu między powtórzeniami
Powtórzenia – Liczba powtórzeń wykonywanych przez timer
Tworzenie ćwiczenia
Możesz stworzyć ćwiczenie na SG Timerze lub w aplikacji Drills.
Aby dowiedzieć się więcej o tworzeniu i korzystaniu z ćwiczeń w aplikacji, zapoznaj się z tym Poradnikiem.
Aby stworzyć nowe ćwiczenie, wybierz „dodaj więcej”.
Ćwiczenie otrzyma domyślną nazwę. Aby ją zmienić, użyj aplikacji Drills. Nazwa zostanie również zmieniona na timerze.
⚠️ Jeśli usuniesz ćwiczenie na timerze, zostanie ono usunięte również w aplikacji i odwrotnie. To samo dotyczy wszystkich ustawień i zmian, które wprowadzisz. Timer i aplikacja Drills mają dwukierunkową synchronizację.
Wybierz swój typ broni. Typ broni to kombinacja ustawień czujnika, takich jak czułość, głośność i filtr echa.
Typy broni mogą być tworzone tylko w aplikacji Drills. Na SG Timerze możesz tylko modyfikować te istniejące. Zauważ, że nadpisze to ustawienia w tym typie broni, również w aplikacji Drills.
Aby dowiedzieć się więcej o tych ustawieniach, zapoznaj się z Przygotowanymi ustawieniami i typami broni.
Wybierz opóźnienie: natychmiastowe, losowe lub niestandardowe.
Tryb klasyczny vs Tryb inteligentny i PAR
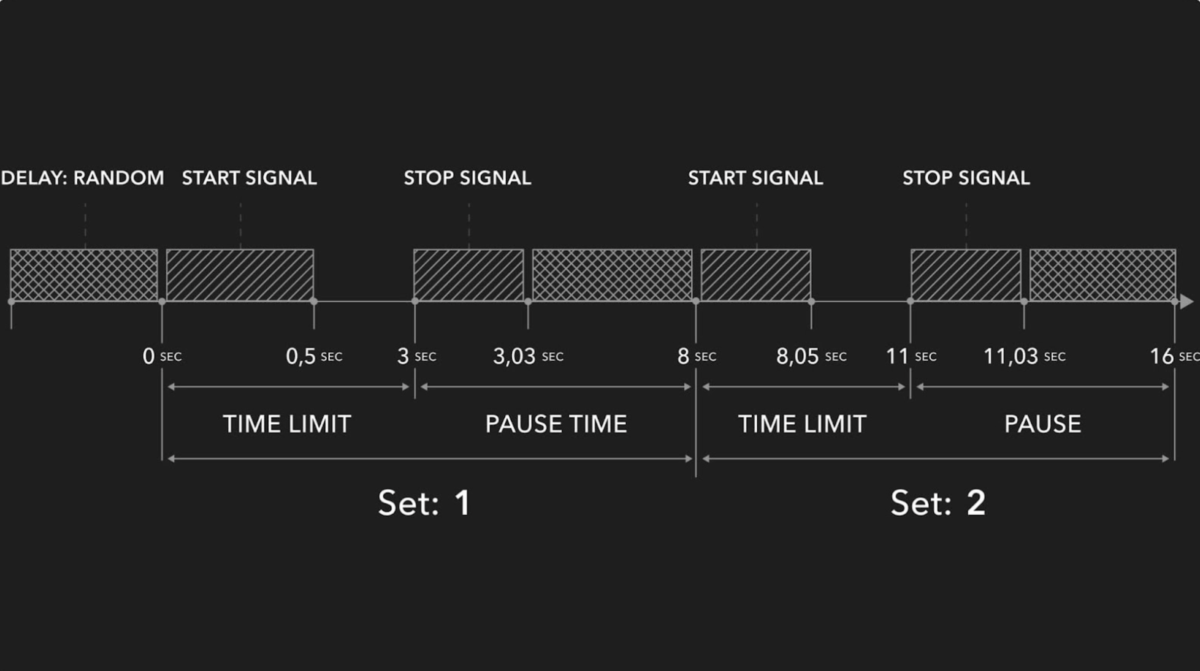
Tryb klasyczny. W trybie klasycznym timer po prostu cyklicznie przechodzi w tryb PAR bez rejestrowania dźwięków.
Na przykład:
Limit czasu – 3 sek
Czas przerwy – 8 sek
Opóźnienie – losowe
Powtórzenia – 5
Timer da sygnał startowy, odliczy 3 sekundy i da sygnał końcowy, gdy czas minie. Następnie odliczy 8 sekund, aby dać czas na reset, a potem zacznie odliczać losowy interwał opóźnienia (1-4 sek.) aby sygnał startowy był dla ciebie nieoczekiwany. Następnie ponownie wyda sygnał startowy i powtórzy sekwencję 4 razy.
⚠️ W takim przypadku nie będziesz rejestrować rzeczywistego czasu suchego strzału. Będziesz musiał polegać na własnej percepcji, aby zdecydować, czy udało Ci się przed sygnałem dźwiękowym, co nie jest zbyt wiarygodne.
⚠️ Sesje trenowane w trybie klasycznym nie będą pojawiać się w statystykach ćwiczeń w aplikacji, ponieważ nie ma nic do śledzenia.
Tryb inteligentny
W trybie inteligentnym timer zarejestruje rzeczywisty dźwięk upadku młotka lub inny krótki i wyraźny dźwięk, który chcesz uchwycić podczas swojego treningu.
Podczas treningu timer może zarejestrować inne niepożądane dźwięki, takie jak przeładowanie, przesuwanie, grzechotanie sprzętu itp. Aby temu zapobiec, użyj ustawienia „Czas oczekiwania” w „Ustawieniach czujnika”. Podczas treningu, po wykonaniu ostatniej czynności (naciśnięciu spustu), musisz poczekać na okres „Czasu oczekiwania”, nie wydając żadnych dźwięków, aż usłyszysz sygnał końcowy.
Na przykład:
Limit czasu – 3 sek
Czas przerwy – 8 sek
Czas oczekiwania – 2 sek
Opóźnienie – losowe
Powtórzenia – 5
Timer wyda sygnał startowy i odliczy 3 sekundy.
Powiedzmy, że nacisnąłeś spust w 3,8 sekundy.
Nie wyda sygnału końca po 3 sekundach. Wyda sygnał potwierdzenia dopiero po upływie interwału czasu oczekiwania po ostatnim wydanym dźwięku. W tym przypadku – w 5,8 sekundy, i pokaże, że spóźniłeś się o 0,8 sekundy.
Aby dowiedzieć się, jak działa Czas oczekiwania, kontynuuj czytanie tego podręcznika.
Po tym, jak timer wyda sygnał potwierdzenia, odliczy 8 sekund, aby dać czas na reset, a następnie zacznie odliczać losowy interwał opóźnienia (1-4 sek.), aby sygnał startowy był dla Ciebie nieoczekiwany. Następnie ponownie wyda sygnał startowy i powtórzy sekwencję 4 razy.
Pozwala to zobaczyć rzeczywisty czas, jaki zajęło Ci naciśnięcie spustu, przeładowanie itp., zamiast zgadywać, czy nacisnąłeś spust przed, w trakcie czy po sygnale końca w trybie klasycznym.
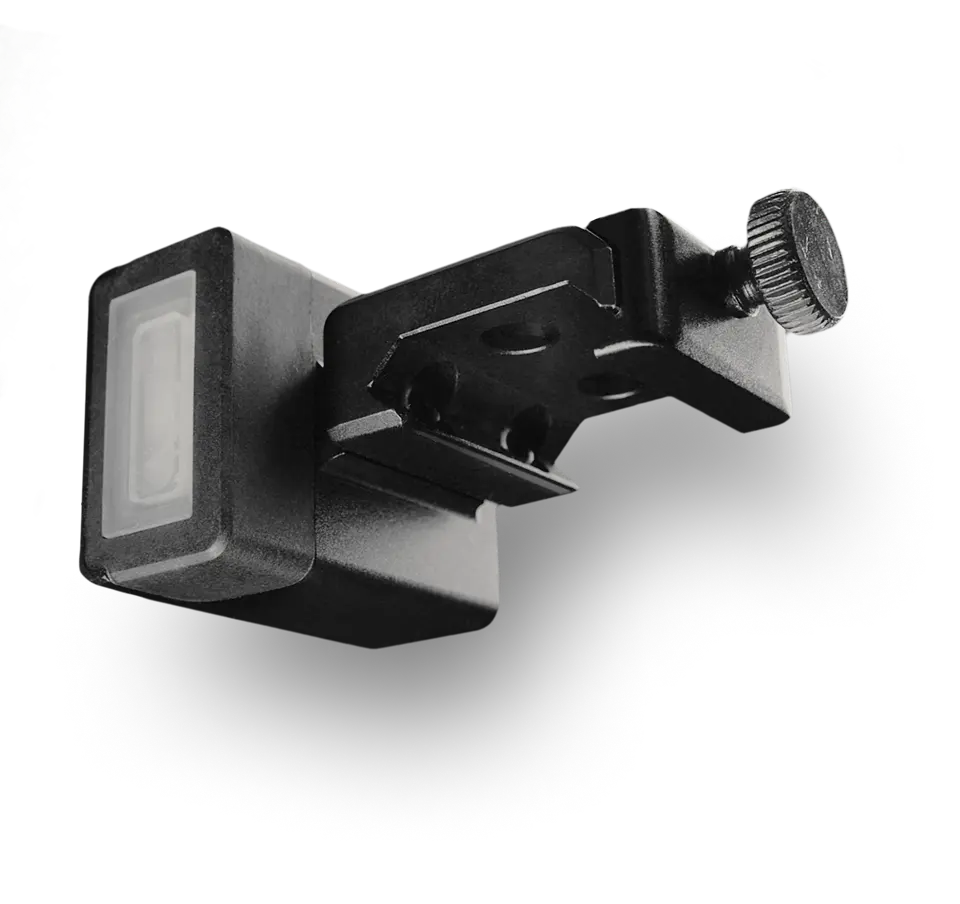
⚠️ Podczas inteligentnego na sucho strzału, zaleca się trzymanie timera na pasku skierowanego w stronę broni lub na stole bezpośrednio pod bronią. Może być konieczne przetestowanie i dostosowanie czułości do swojego spustu. Spróbuj spojrzeć na wyświetlacz timera, gdy naciskasz spust, aby upewnić się, że timer rejestruje dźwięk.
⚠️ Możesz zmienić tryb podczas treningu, ale sesje wykonane w trybie klasycznym nie będą widoczne w statystykach ćwiczeń w aplikacji, ponieważ nie ma czego śledzić.
„Czas oczekiwania” to okres strefy bezpieczeństwa. Podczas treningu na sucho występuje wiele obcych dźwięków, takich jak przeładowanie, przesuwanie zamka lub dźwięk sprzętu, które mogą zostać zarejestrowane przez timer jako upadek iglicy. Ponieważ upadek iglicy jest bardzo podobny do wszystkich tych innych dźwięków pod względem głośności i brzmienia, niemożliwe jest ich rozróżnienie elektronicznie.
Timer odlicza czas od ostatniego zarejestrowanego dźwięku i jeśli nie wykryje żadnych innych dźwięków w tym okresie, uznaje ten dźwięk za opadanie kurka i kończy zestaw.
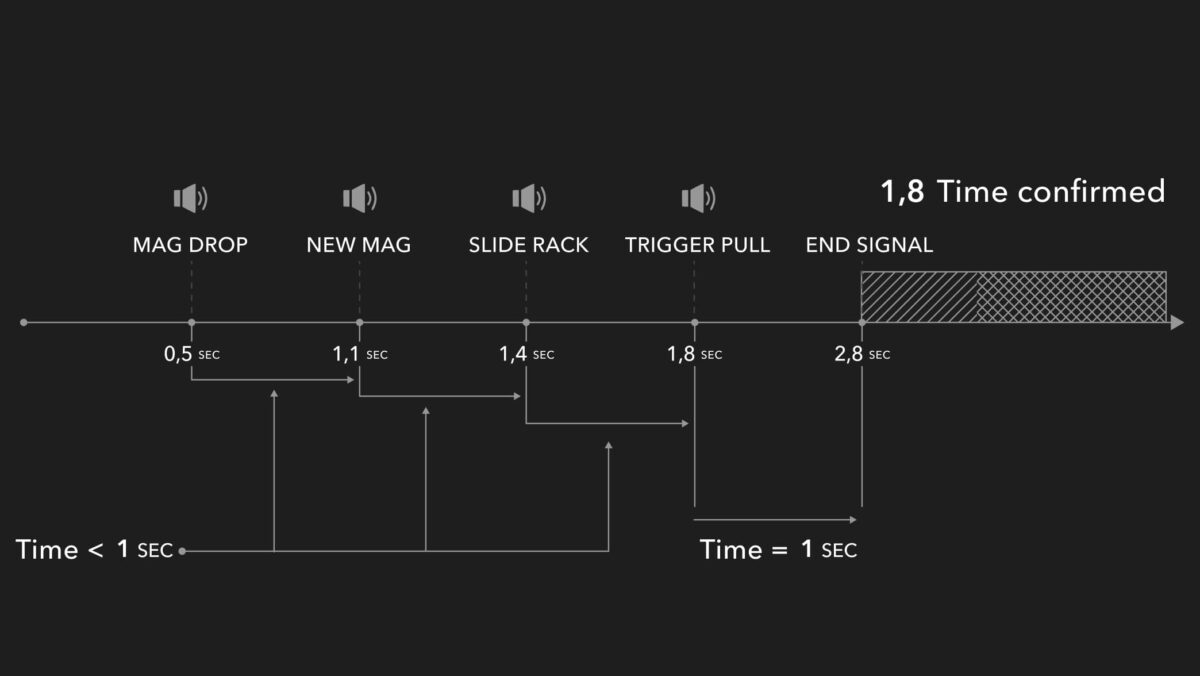
Na przykład, weźmy ćwiczenie ładowania broni. Czas oczekiwania ustawiony jest na 1 sekundę.
Magazynek wypada w 0,5 sekundy — timer rejestruje to, ale jeszcze nie uznaje za zakończenie i zaczyna odliczać 1 sekundę.
W 1,1 sekundy wkładasz nowy magazynek. Timer rejestruje dźwięk, ale go nie uznaje, ponieważ od poprzedniego dźwięku minęło mniej niż 1 sekunda. Zaczyna ponownie odliczać 1 sekundę.
W 1,4 sekundy słychać dźwięk zamka. Tak samo jak z poprzednim dźwiękiem.
W 1,8 sekundy naciskasz spust i czekasz przez 1 sekundę. Timer rejestruje ten dźwięk, zaczyna odliczać 1 sekundę, i ponieważ po pociągnięciu spustu nie wydajesz już żadnych dźwięków, timer uznaje ten dźwięk za prawidłowy i daje sygnał końcowy.
W ten sposób nie będziesz mieć sterty bezużytecznych kodów czasowych, tylko rzeczywisty czas wykonania.
Możesz również dostosować timer do swoich potrzeb, regulując czas oczekiwania.
Podczas treningu w trybie klasycznym na ekranie zobaczysz:
Liczba powtórzeń
Faza sesji (limit czasu / czas przerwy / opóźnienie)
Pozostały czas w bieżącej fazie
Podczas treningu w trybie inteligentnym na ekranie zobaczysz:
Liczba powtórzeń
Faza sesji. Ikona mikrofonu oznacza, że limit czasu jest aktywny, a timer rejestruje dźwięki. Zaznaczenie oznacza fazę czasu przerwy – osiągnąłeś cel. Krzyżyk oznacza fazę czasu przerwy – nie osiągnąłeś celu.
Zarejestrowane dźwięki.
Pozostały czas w bieżącej fazie.
Różnica między celem a czasem wykonania.
Duża liczba na środku ekranu oznacza ostateczny czas potwierdzony przez timer.
Jeśli wykonałeś suchy strzał w trybie klasycznym, żadne wyniki nie zostaną wyświetlone na timerze. Sesja zostanie zapisana w aktywności na timerze, jeśli nagrałeś wideo z tej sesji.
Jeśli wykonałeś suchy strzał w trybie inteligentnym, po zakończeniu ćwiczenia zobaczysz ekran z wszystkimi swoimi powtórzeniami. Twój czas wykonania będzie na środku, a po prawej stronie będzie delta między Twoim limitem czasu a czasem wykonania.
Na przykład, jeśli limit czasu wynosił 3 sekundy, a ty nacisnąłeś spust po 2,7 sekundy, timer pokaże -0,3.
Twoje wyniki zostaną zapisane w „Historii” i wysłane do aplikacji Drills, gdy połączysz timer z aplikacją.
Dowiedz się więcej o zakładce „Historia” tutaj.
⚠️ Nie musisz mieć zawsze podłączonego Timera do aplikacji Drills. Cała twoja historia i zmiany, które wprowadziłeś w drillach, pojawią się w aplikacji Drills, gdy je połączysz.
Dowiedz się więcej o statystykach drillów w aplikacji tutaj.