Wprowadzenie
Menu Ćwiczenia na sucho pozwala tworzyć własne ćwiczenia i śledzić postępy danego ćwiczenia w czasie dzięki rozszerzonym statystykom i wykresom w aplikacji Drills w trybie Smart.
Możesz też trenować z klasycznymi sygnałami PAR w klasycznym trybie na sucho.
Aby wybrać ćwiczenia na sucho, naciśnij i przytrzymaj przycisk Funkcji, aż zobaczysz „Ćwiczenia na sucho”. Następnie naciśnij przycisk Funkcji, aby przewijać ćwiczenia.
Pod nazwą trybu zobaczysz Opóźnienie (w lewym dolnym rogu), Limit czasowy i Liczbę powtórzeń (w prawym dolnym rogu).
Tworzenie ćwiczenia
Ogólne ustawienia. Tworzenie ćwiczenia Dry Fire jest bardzo podobne do tworzenia treningu strzeleckiego. Główna różnica w porównaniu do treningu strzeleckiego polega na tym, że Dry Fire nie ma złożonego ustawienia czasu PAR. Możesz ustawić tylko 1 zestaw i liczbę powtórzeń tego zestawu.
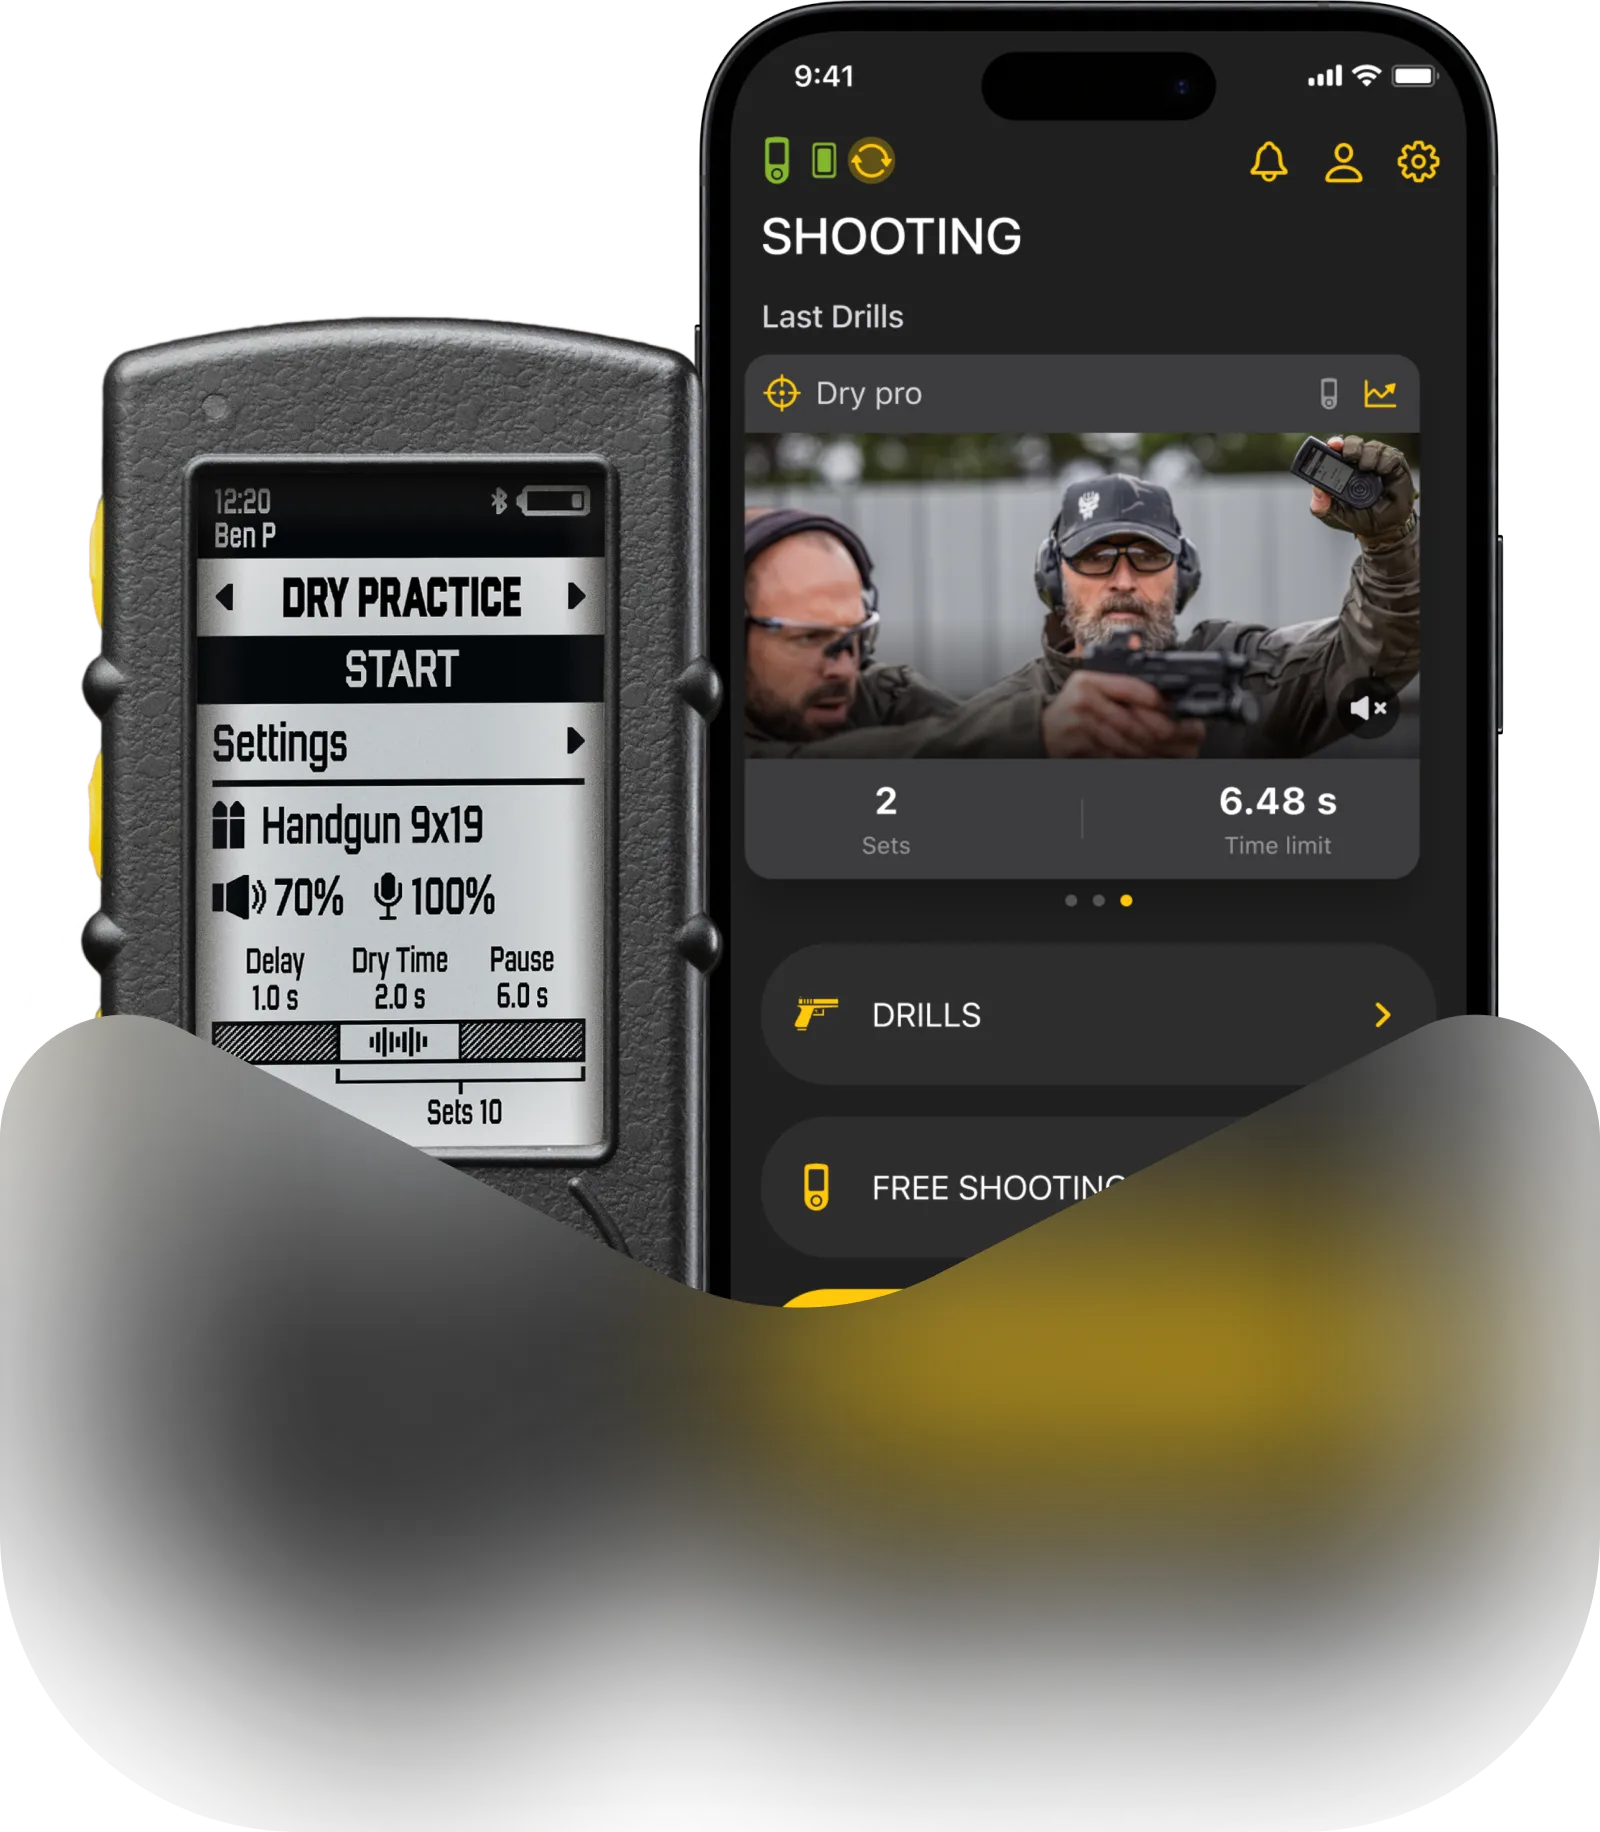
Otwórz aplikację Drills i połącz swój SG Timer GO.
Aby stworzyć nowe ćwiczenie, stuknij „+ Nowe ćwiczenie”, aby otworzyć ekran ustawień. Dostosuj je lub użyj ustawień domyślnych.
Wybierz typ ćwiczenia: Dry Fire lub Shooting.
Możesz przełączać się między tymi trybami, ale tylko podczas początkowej konfiguracji. Po ukończeniu ćwiczenia po raz pierwszy ta opcja zostanie zablokowana, a wyświetlony zostanie tylko wybrany tryb.
Aby spersonalizować swoje ćwiczenie, wprowadź nazwę, opcjonalnie dodaj opis i załaduj jedno zdjęcie lub wideo (do 1 minuty).
Classic vs Smart Mode and PAR
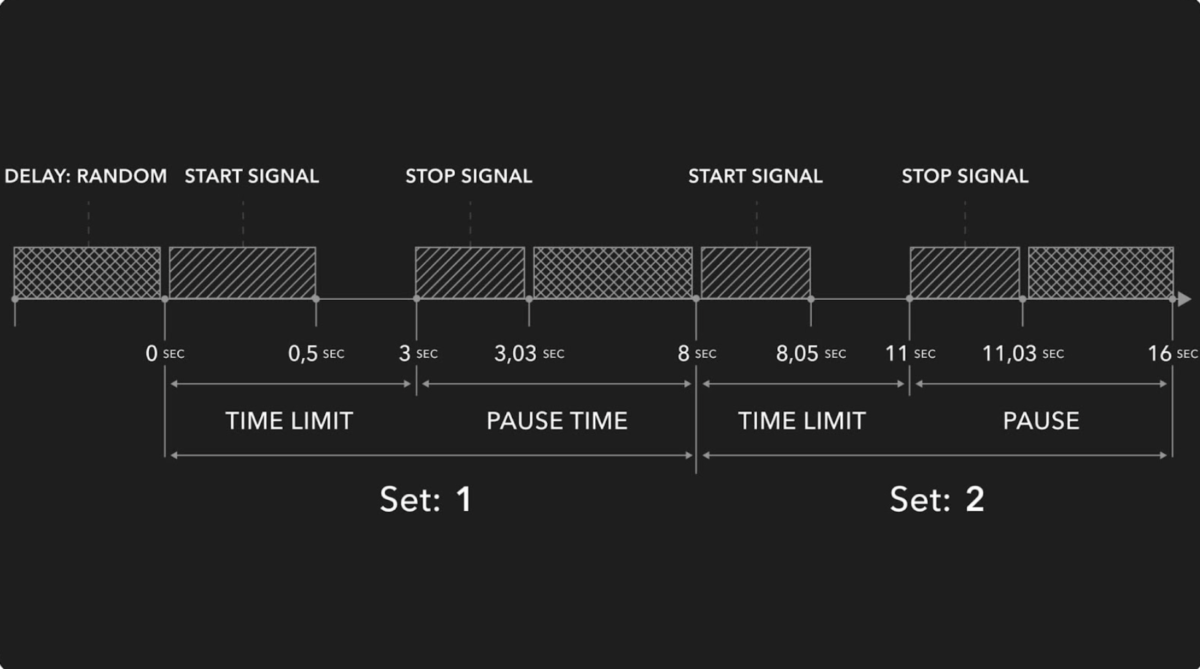
Tryb klasyczny. W trybie klasycznym timer będzie działać w trybie PAR, powtarzając się bez rejestrowania dźwięków.
Na przykład:
Limit czasu – 3 sek
Czas przerwy – 8 sek
Opóźnienie – losowe
Powtórzenia – 5
Timer wyda sygnał startowy, odliczy 3 sekundy, a następnie wyda sygnał zakończenia, gdy czas się skończy. Następnie odliczy 8 sekund, aby dać czas na zresetowanie, a potem rozpocznie odliczanie losowego opóźnienia (1-4 sekundy), aby sygnał startowy był dla ciebie nieoczekiwany. Następnie ponownie wyda sygnał startowy i powtórzy sekwencję jeszcze 4 razy.
⚠️ W takim przypadku nie będziesz rejestrować swojego rzeczywistego czasu sucha. Będziesz musiał polegać na własnej percepcji, aby zdecydować, czy udało Ci się wykonać to przed sygnałem, co nie jest zbyt wiarygodne.
⚠️ Sesje trenowane w trybie klasycznym nie będą pojawiać się w statystykach ćwiczeń w aplikacji, ponieważ nie ma nic do śledzenia.
Smart mode
W trybie inteligentnym timer zarejestruje rzeczywisty dźwięk opadającego kurka lub inny krótki i wyraźny dźwięk, który chcesz uchwycić podczas treningu.
Podczas treningu timer może wychwycić inne niepożądane dźwięki, takie jak przeładowanie, zamek, stukot sprzętu itp. Aby tego uniknąć, użyj ustawienia „Czas oczekiwania” w sekcji „Ustawienia sensora”. Podczas treningu, po wykonaniu ostatniej czynności (naciśnięciu spustu), należy odczekać ustawiony „Czas oczekiwania” bez wydawania żadnych dźwięków, aż usłyszysz sygnał końcowy.
Na przykład:
Limit czasu – 3 sek
Czas pauzy – 8 sek
Czas oczekiwania – 2 sek
Opóźnienie – losowe
Powtórzenia – 5
Timer wyda sygnał startowy i odliczy 3 sekundy.
Załóżmy, że naciskasz spust w 3,8 sekundy.
Nie wyda sygnału końcowego po 3 sekundach. Wyda sygnał potwierdzający dopiero po upływie czasu oczekiwania od ostatniego dźwięku, jaki został przez ciebie wygenerowany. W tym przypadku – o 5,8 sekundy – i pokaże, że spóźniłeś się o 0,8 sekundy.
Aby dowiedzieć się, jak działa Czas oczekiwania, kontynuuj czytanie tego podręcznika.
Po tym, jak timer wyda sygnał potwierdzający, odliczy 8 sekund, aby dać czas na reset, a następnie zacznie odliczać losowy czas opóźnienia (1–4 sekundy), aby uczynić sygnał startowy nieprzewidywalnym. Następnie ponownie wyda sygnał startowy i powtórzy sekwencję jeszcze 4 razy.
To pozwala zobaczyć rzeczywisty czas, jaki zajęło ci pociągnięcie za spust, przeładowanie itp., zamiast zgadywać, czy zrobiłeś to przed, w trakcie czy po sygnale końcowym w trybie Klasycznym.
⚠️ Podczas treningu na sucho w trybie Smart zaleca się umieszczenie timera na pasku skierowanego w stronę broni lub na stole bezpośrednio pod bronią. Może być konieczne przetestowanie i dostosowanie czułości do twojego spustu. Spróbuj spojrzeć na wyświetlacz timera w momencie naciskania spustu, aby upewnić się, że timer zarejestrował dźwięk.
⚠️ Możesz zmieniać tryb podczas treningu, ale sesje wykonane w trybie klasycznym nie będą widoczne w statystykach ćwiczeń w aplikacji, ponieważ nie ma czego śledzić.
Czas oczekiwania
„Czas oczekiwania” to okres strefy bezpieczeństwa. Podczas treningu na sucho występuje wiele dźwięków zakłócających, takich jak przeładowanie, ruch zamka czy brzęk sprzętu, które timer może zinterpretować jako opad kurka. Ponieważ dźwięk opadającego kurka jest bardzo podobny pod względem głośności i charakterystyki do tych dźwięków, nie da się ich elektronicznie rozróżnić.
Dlatego timer odlicza czas od ostatniego zarejestrowanego dźwięku i jeśli nie zarejestruje żadnych innych dźwięków w tym okresie, uznaje ten dźwięk za upadek młotka i kończy zestaw.
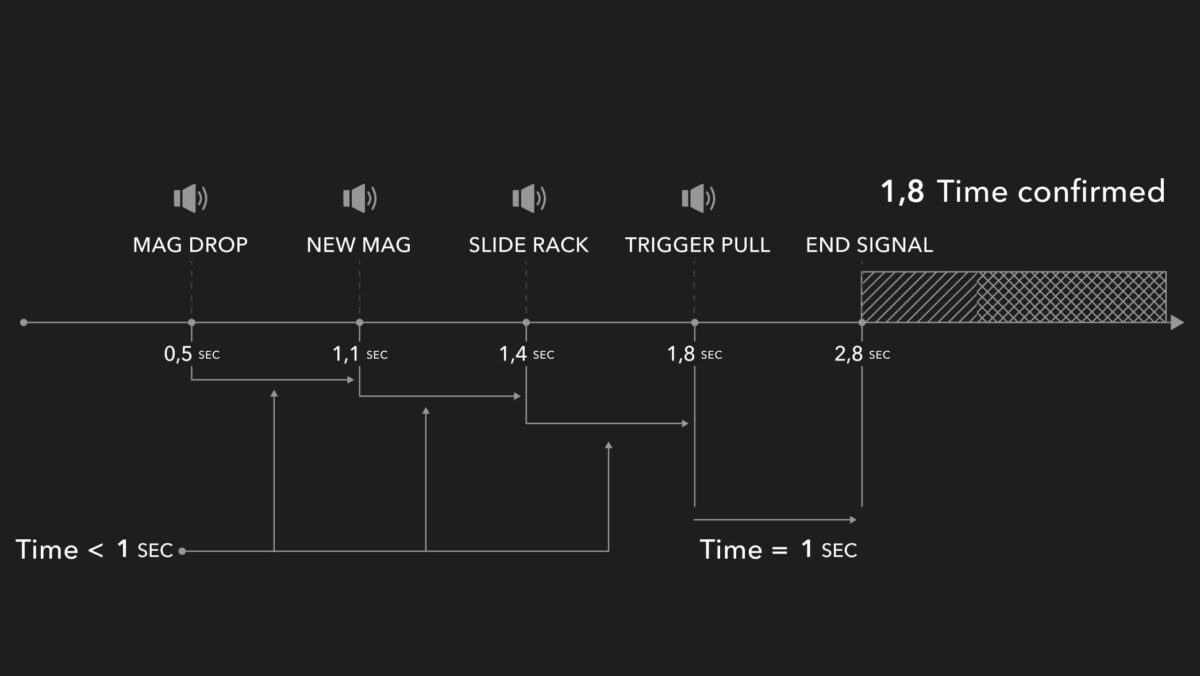
Na przykład, weźmy ćwiczenie przeładowania. Czas oczekiwania ustawiony jest na 1 sekundę.
Magazynek upada po 0,5 sekundy — timer rejestruje to, ale jeszcze nie uznaje tego za zakończenie, zaczyna odliczać 1 sekundę.
W 1.1 sekundy wkładasz nowy magazynek. Timer rejestruje dźwięk, ale nie uznaje go, ponieważ minęło mniej niż 1 sekunda od ostatniego dźwięku. Zaczyna liczyć 1 sekundę ponownie.
1.4 sekundy — dźwięk przeładowania. To samo, co z poprzednim dźwiękiem.
W 1.8 sekundy ściągasz spust i zamarzasz na 1 sekundę po tym. Timer rejestruje ten dźwięk i zaczyna liczyć 1 sekundę. A ponieważ nie wydajesz żadnych więcej dźwięków po ściągnięciu spustu, timer uznaje ten dźwięk i daje sygnał końcowy.
W ten sposób nie masz sterty nieużytecznych znaczników czasowych — tylko rzeczywisty czas wykonania.
Możesz również zaprogramować timer zgodnie z własnymi potrzebami, dostosowując czas oczekiwania.
Strzały na sucho i przeglądanie wyników
Podczas treningu w trybie klasycznym na ekranie zobaczysz:
Faza sesji (limit czasu / czas przerwy / opóźnienie)
Liczba powtórzeń
Pozostały czas w bieżącej fazie
Podczas treningu w trybie smart na ekranie zobaczysz:
🔸 Liczba powtórzeń.
🔸 Faza sesji. Ikona fali oznacza, że limit czasu jest aktywny, a timer rejestruje dźwięki. Ikona pauzy oznacza, że faza przerwy jest aktywna.
🔸 Zarejestrowane dźwięki.
🔸 Czas pozostały w bieżącej fazie.
🔸 Zaznaczenie oznacza fazę przerwy – osiągnąłeś cel. Krzyżyk oznacza fazę przerwy – nie osiągnąłeś celu.
🔸 Delta pomiędzy celem a czasem wykonania.
🔸 Duża liczba na środku ekranu oznacza czas końcowy potwierdzony przez timer.
Jeśli wykonałeś suchy strzał w trybie klasycznym, wyniki nie będą wyświetlane na timerze. Sesja zostanie zapisana w aktywności timera, jeśli nagrałeś wideo z tej sesji.
Jeśli wykonałeś suchy strzał w trybie smart, po zakończeniu ćwiczenia zobaczysz ekran ze wszystkimi swoimi powtórzeniami. Numer powtórzenia, czas wykonania oraz po prawej stronie delta między limitem czasu a czasem wykonania.
Na przykład, jeśli limit czasu wynosił 3 sekundy, a pociągnąłeś za spust w 2,7 sekundy, timer wyświetli -0,3.
Twoje wyniki zostaną wysłane do aplikacji Drills, gdy połączysz timer z nią. Dowiedz się więcej o zakładce „Historia” tutaj.
Użyj przycisku Funkcja, aby przewinąć wyniki w dół. Naciśnij i przytrzymaj przycisk Funkcja, aby wrócić do ekranu głównego.
⚠️ Nie musisz mieć timera cały czas podłączonego do aplikacji Drills. Cała twoja historia i zmiany, które wprowadziłeś w ćwiczeniach, pojawią się w aplikacji Drills, gdy je połączysz.
Dowiedz się więcej o statystykach w aplikacji tutaj.
“